
阿帕奇点燃, 从版本1.6 提供了一个新的方式做数据处理基于卡夫卡连接。卡夫卡连接, 一个新的特点, 在 apache 卡夫卡 0.9, 使可伸缩和可靠的流数据之间的 apache 卡夫卡和其他数据系统。它使您可以轻松地将新系统添加到内存中可伸缩和安全的流数据管线中。在本文中, 我们将研究如何设置和配置点火源连接器, 以便在点火簇之间执行数据复制。
阿帕奇点燃, 在箱外, 提供了三种不同的解决方案 (API) 的点燃卡夫卡模块, 以实现一个强大的数据处理管道, 从/到卡夫卡主题到 Apache 点燃。

简而言之, Apache IgniteSourceConnector是用来订阅点燃缓存事件, 并流到卡夫卡的主题。换言之, 它可用于从点燃式缓存中导出数据 (已更改的数据集), 并仅使用配置文件将内容写入卡夫卡主题中。点燃源连接器侦听注册的点燃网格事件, 如投入, 并将它们转发到卡夫卡主题。这将使已保存到点火缓存中的数据易于转化为事件流。每个事件流都包含一个键和两个值: 旧的和新的。

这篇文章的部分从书被采取了Apache 点燃书。如果它让你感兴趣, 看看其余的书, 以获得更多有用的信息。
IgniteSourceConnector可用于支持以下用例:
- 在缓存事件发生时自动通知任何客户端, 例如, 在缓存中有新条目时。
- 使用从点火缓存流到 1 N 个目标的异步事件。目标可以是任何数据库或其他点燃群集。这些使您可以通过卡夫卡在两个点燃集群之间进行数据复制。
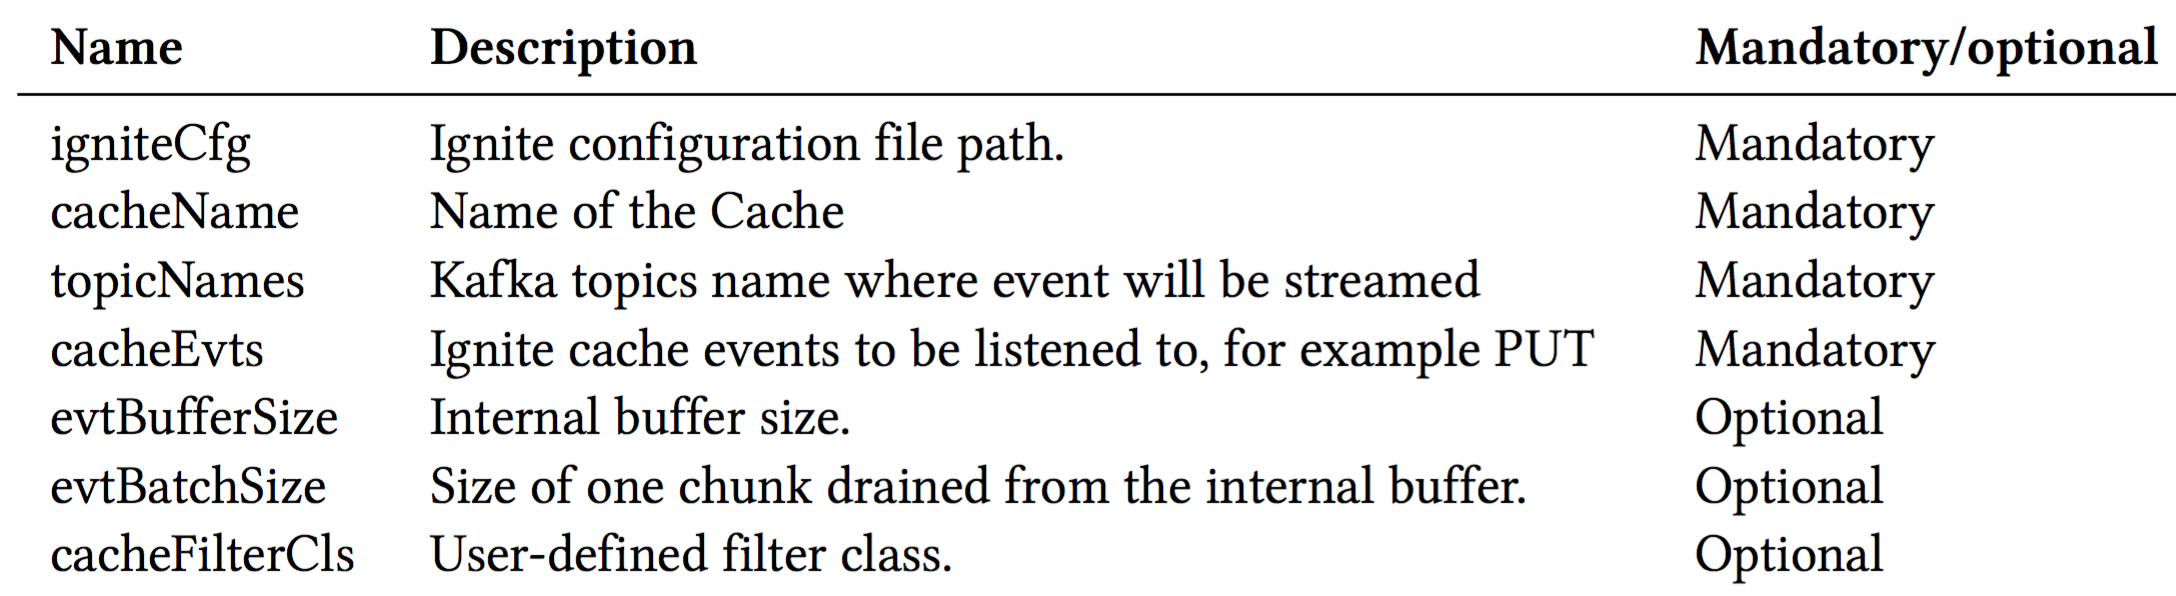
阿帕奇IgniteSourceConnector船舶与 IgniteSinkConnector, 并可在点燃-卡夫卡-x.x.x. 罐子分发。IgniteSourceConnector 需要以下配置参数:
IgniteSinkConnector的高级架构如下图1所示。

在本文中, 我们将使用IgniteSourceConnector和IgniteSinkConnector的流事件从一个点燃集群到另一个。IgniteSourceConnector 将将事件从一个点燃集群 (源群集) 流到卡夫卡主题, 并且 IgniteSinkConnector 将从主题到另一个点燃群集 (目标群集) 的更改流。我们将演示分步说明来配置和运行源和接收器接口
在发送到点燃目标群集之前, 开发一个流提取器来分析传入的数据。
配置并启动不同独立的卡夫卡员工的点火源和水槽连接器。
将一些数据添加或修改到点火源群集中。
完成所有配置后, 您应该有一个典型的管道, 它将数据从一个点火群集流到另一个, 如图2所示。

让我们从点火群集配置开始。
步骤 1.我们要在一台机器上启动两个独立的集群。为了实现这一点, 我们必须使用不同的TcpDiscoverySpi和TcpConfigurationSpi集来分隔单个主机上的两个群集。因此, 对于第一个群集的节点, 我们将使用以下TcpDiscoverySpi和TcpConfigurationSpi配置:
<?xml version="1.0" encoding="UTF-8"?>
<beans xmlns="http://www.springframework.org/schema/beans"
       xmlns:xsi="http://www.w3.org/2001/XMLSchema-instance"
       xmlns:util="http://www.springframework.org/schema/util"
       xsi:schemaLocation="
        http://www.springframework.org/schema/beans
        http://www.springframework.org/schema/beans/spring-beans.xsd
        http://www.springframework.org/schema/util
        http://www.springframework.org/schema/util/spring-util.xsd">
<bean id="ignite.cfg" class="org.apache.ignite.configuration.IgniteConfiguration">
        <property name="peerClassLoadingEnabled" value="true"/>
        <property name="cacheConfiguration">
            <list>
                <!-- Partitioned cache example configuration (Atomic mode). -->
                <bean class="org.apache.ignite.configuration.CacheConfiguration">
                    <property name="name" value="myCacheSource"/>
                    <property name="atomicityMode" value="ATOMIC"/>
                    <property name="backups" value="1"/>
                </bean>
            </list>
        </property>
        <!-- Enable cache events. -->
        <property name="includeEventTypes">
            <list>
                <!-- Cache events. -->
                <util:constant static-field="org.apache.ignite.events.EventType.EVT_CACHE_OBJECT_PUT"/>
            </list>
        </property>
<property name="discoverySpi">
            <bean class="org.apache.ignite.spi.discovery.tcp.TcpDiscoverySpi">
                <!-- Initial local port to listen to. -->
                <property name="localPort" value="48500"/>
<!-- Changing local port range. This is an optional action. -->
                <property name="localPortRange" value="20"/>
<!-- Setting up IP finder for this cluster -->
                <property name="ipFinder">
                    <bean class="org.apache.ignite.spi.discovery.tcp.ipfinder.vm.TcpDiscoveryVmIpFinder">
                        <property name="addresses">
                            <list>
                                <value>127.0.0.1:48500..48520</value>
                            </list>
                        </property>
                    </bean>
                </property>
            </bean>
        </property>
<!--
        Explicitly configure TCP communication SPI changing local
        port number for the nodes from the first cluster.
        -->
        <property name="communicationSpi">
            <bean class="org.apache.ignite.spi.communication.tcp.TcpCommunicationSpi">
                <property name="localPort" value="48100"/>
            </bean>
        </property>
    </bean>
</beans>
我们指定了要侦听的本地端口 48500 , 并使用静态 IP 查找器来发现节点以上述配置开头的每个触发节点都将只加入此群集, 并且不会对同一主机上的另一个群集可见。请注意, 我们还启用EVT_CACHE_OBJECT_PUT事件, 以获取 PUT 每个条目到缓存中的事件通知。作为数据源, 我们将使用 myCacheSource 复制的缓存。将文件名保存 isolated-cluster-1-kafka-source.xml 在 $IGNITE_HOME/examples/config 文件夹中。
对于第二个群集的节点, 我们必须使用另一组端口。配置将如下所:
<?xml version="1.0" encoding="UTF-8"?>
<beans xmlns="http://www.springframework.org/schema/beans"
       xmlns:xsi="http://www.w3.org/2001/XMLSchema-instance"
       xsi:schemaLocation="
        http://www.springframework.org/schema/beans
        http://www.springframework.org/schema/beans/spring-beans.xsd">
<bean id="ignite.cfg" class="org.apache.ignite.configuration.IgniteConfiguration">
        <property name="peerClassLoadingEnabled" value="true"/>
        <property name="cacheConfiguration">
            <list>
                <!-- Partitioned cache example configuration (Atomic mode). -->
                <bean class="org.apache.ignite.configuration.CacheConfiguration">
                    <property name="name" value="myCacheTarget"/>
                    <property name="atomicityMode" value="ATOMIC"/>
                    <property name="backups" value="1"/>
                </bean>
            </list>
        </property>
        <property name="discoverySpi">
            <bean class="org.apache.ignite.spi.discovery.tcp.TcpDiscoverySpi">
                <!-- Initial local port to listen to. -->
                <property name="localPort" value="49500"/>
<!-- Changing local port range. This is an optional action. -->
                <property name="localPortRange" value="20"/>
<!-- Setting up IP finder for this cluster -->
                <property name="ipFinder">
                    <bean class="org.apache.ignite.spi.discovery.tcp.ipfinder.vm.TcpDiscoveryVmIpFinder">
                        <property name="addresses">
                            <list>
                                <value>127.0.0.1:49500..49520</value>
                            </list>
                        </property>
                    </bean>
                </property>
            </bean>
        </property>
        <!--
        Explicitly configure TCP communication SPI changing local port number
        for the nodes from the second cluster.
        -->
        <property name="communicationSpi">
            <bean class="org.apache.ignite.spi.communication.tcp.TcpCommunicationSpi">
                <property name="localPort" value="49100"/>
            </bean>
        </property>
    </bean>
</beans>
对于第二个群集中的节点, 我们将发现端口 49500 和通信端口定义为 49100 。这两种配置之间的区别是 SPIs 和 IP 查找的唯一的端口号不同。将此配置保存为具有名称的文件 isolated-cluster-1.xml , 并将文件放到文件夹中 $IGNITE_HOME/examples/config 。
让我们测试一下配置。使用不同的配置文件在单独的控制台中启动两个点火节点。下面是一个如何运行点火节点的示例。
ignite.sh $IGNITE_HOME/examples/config/isolated-cluster-1-kafka-source.xml
ignite.sh $IGNITE_HOME/examples/config/isolated-cluster-2.xml
下一屏幕截图显示上述命令的结果。正如预期的那样, 两个单独的点火节点在不同的群集中运行。”类 =” fr-dib “src =” http://www.cheeli.com.cn/wp-content/uploads/2018/10/10411368-figure8-8.png “标题 =” 图 3. 宽度 = “633”/>
请注意, 所有列表和配置文件都可在GitHub 存储库中使用。
步骤 2.接下来, 需要定义用于将数据转换为键值元组的流抽取器。创建 Maven 项目并将以下依赖项添加到 pom.xml 。
<dependency>
  <groupId>org.apache.ignite</groupId>
  <artifactId>ignite-kafka</artifactId>
  <version>2.6.0</version>
</dependency>
我们使用 ignite-kafka 模块作为我们的依赖性。将以下 Java 类与名称一起添加 CsvStreamExtractor 到 com.blu.imdg 将实现接口的包中, 如下所 StreamSingleTupleExtractor 示:
public class CsvStreamExtractor implements StreamSingleTupleExtractor<SinkRecord, String, String> {
  public Map.Entry<String, String> extract(SinkRecord sinkRecord) {
          System.out.println("SinkRecord:"+ sinkRecord.value().toString());
    String[] parts = sinkRecord.value().toString().split(",");
          String key = ((String[])parts[2].split("="))[1];
          String val= ((String[])parts[7].split("="))[1];
          return new AbstractMap.SimpleEntry<String, String>(key, val);
      }
}
该方法 extract 是类的主力 CsvStreamExtractor 。这里的代码很简单: 它从事件的每个元组检索键和值, 其中每个元组在流中作为 a 公开 SinkRecord 。该 extract 方法返回键值对, 该对将被发送到点火群集 (目标), 以便在缓存中进一步存储。
使用 Maven 命令编译和生成项目: mvn clean install 。成功编译项目后, kafka-1.0.jar 应在项目目标目录中创建一个名为命名的新库。将库复制到文件夹 $KAFKA_HOME/libs 。
步骤 3。现在, 我们的流提取器已经准备好使用了, 让我们配置点火源和接收接口, 并让它们开始复制数据。让我们创建一个名 ignite-connector- source.properties 为目录的文件 $KAFKA_HOME/myconfig 。添加以下属性并保存文件。
# connector
name=my-ignite-source-connector
connector.class=org.apache.ignite.stream.kafka.connect.IgniteSourceConnector
tasks.max=2
topicNames=test2
# cache
cacheName=myCacheSource
cacheAllowOverwrite=true
cacheEvts=put
igniteCfg=PATH_TO_THE_FILE/isolated-cluster-1-kafka-source.xml
在前面的连接器配置中, 我们已将其定义 org.apache.ignite.stream.kafka.connect.IgniteSourceConnector 为连接器类。我们还将 test2 指定为主题名称, 其中存储流事件。接下来, 对于缓存配置, 我们已经将将事件定义为网格远程事件。在我们的例子中, 我们使用 myCacheSource 作为源缓存。这里, 另一个关键属性是 igniteCfg , 我们明确指定了一个孤立的群集配置。1组将是我们的事件来源。
接下来, 让我们配置点火水槽连接器。创建另一个具有该名称的文件 ignite- connector-sink.properties 到 $KAFKA_HOME/myconfig 目录中
# connector
name=my-ignite-sink-connector
connector.class=org.apache.ignite.stream.kafka.connect.IgniteSinkConnector
tasks.max=2
topics=test2
# cache
cacheName=myCacheTarget
cacheAllowOverwrite=true
igniteCfg=PATH_TO_THE_FILE/isolated-cluster-2.xml
singleTupleExtractorCls=com.blu.imdg.CsvStreamExtractor
配置与上一节中使用的配置相同。主要的区别是 singleTupleExtractorCls 我们指定了在步骤2中开发的流抽取器的属性。
步骤 4。按照卡夫卡的文档中所述, 启动动物园管理员和卡夫卡代理 (服务器)。
步骤 5。你可以猜到, 我们必须创建一个新的卡夫卡主题与名称 test2。让我们使用以下命令创建主题。
$KAFKA_HOME/bin/kafka-topics.sh --create --zookeeper localhost:2181 --replication-factor \ 1 --partitions 1 --topic test2步骤 6。让我们在单独的控制台中启动源和接收器接口。首先, 使用以下命令启动源连接器。
bin/connect-standalone.sh myconfig/connect-standalone.properties myconfig/ignite-connecto\ r-source.properties这将使用默认的连接器独立属性启动源连接器。请注意, 此连接器还将启动一个点燃服务器节点, 我们将加入我们的点燃集群 1。
拼图的最后一块是水槽连接器。现在, 我们已准备好启动接收器接口。但是, 在独立模式下启动另一个卡夫卡连接器之前, 我们必须更改连接器的 REST 端口和存储文件名。创建一个名为 “连接” 的文件 standalone-sink.properties 到该 $KAFKA_HOME/myconfig 文件夹中。向其中添加以下属性。
bootstrap.servers=localhost:9092
key.converter=org.apache.kafka.connect.storage.StringConverter
value.converter=org.apache.kafka.connect.storage.StringConverter
key.converter.schemas.enable=false
value.converter.schemas.enable=false
internal.key.converter=org.apache.kafka.connect.storage.StringConverter
internal.value.converter=org.apache.kafka.connect.storage.StringConverter
internal.key.converter.schemas.enable=false
internal.value.converter.schemas.enable=false
offset.storage.file.filename=/tmp/connect-1.offsets
rest.port=8888
offset.flush.interval.ms=10000
大多数配置与以前相同, 只有 rest.port 和 offset.storage.file.filename 不同。我们已经为这个连接器显式定义了一个新端口 8888 , 也指定了另一个文件存储。从目录启动与此配置的连接器 $KAFKA_HOME 。
bin/connect-standalone.sh myconfig/connect-standalone-sink.properties myconfig/ignite-con\ nector-sink.properties上面的命令将在另一个控制台上启动一个接收器接口。下图显示了两个连接器上的屏幕截图, 并在单独的控制台上运行。

步骤 7。既然我们已经设置了连接器, 现在是测试流管道的时候了。此时, 如果我们将某些条目放入在 myCacheSource 群集1上创建的缓存中, 则应将这些项复制到 myCacheTarget 群集2上的缓存中。我们有几种方法可以将某些条目加载到缓存中, myCacheSource 使用点火 REST API 或 Java 客户端com/srecon/the-apache-ignite-book/tree/master/chapters/chapter-2 “href =” https://github.com/srecon/the-apache-ignite-book/tree/master/chapters/chapter-2 “相对 =” nofollow “目标 =” _blank “>> 本文所绘制的书的2章.
$ java -jar ./target/IsolatedCLient-runnable.jar此 Java 客户端将 22 项加载到缓存中 myCacheSource 。让我们来观察一下点燃星团会发生什么。使用两个点火遮阳工具连接到群集, 每个群集一个。执行 cache -scan 命令扫描缓存, 您应该得到一个非常类似的截图, 如图5所示。

如图5所示, 不同簇中的每个缓存都包含相同的条目集。如果仔细查看控制台上的点火水槽连接器日志, 则应查找与以下内容类似的日志:
CacheEvent [cacheName=myCacheSource, part=64, key=Key:150, xid=null, lockId=GridCacheVersion [topVer=150300733, order=1538826349084, nodeOrder=4], newVal=Hello World!!: 150, oldVal=null, hasOldVal=false, hasNewVal=true, near=false, subjId=572ac224-f48b-4a0c-a844-496f4d609b6a, cloClsName=null, taskName=null, nodeId8=fb6ae4b6, evtNodeId8=572ac224, msg=Cache event., type=CACHE_OBJECT_PUT, tstamp=1538829094472]
Key:150
Val:Hello World!!:
点燃源连接器将缓存 PUT 事件作为元组流到主题中 test2 , 其中包含元数据以及键和值: 旧的和新的值。点火水槽接头使用 CsvStreamExtractor 抽取器从元组检索值, 并将键值对存储到缓存中 myCacheTarget 。
在上面的例子中, 我们只配置了一个方向的实时数据复制在点燃集群之间。但是, Apache 点燃卡夫卡连接器将大量的电源打包到一个小模块中。通过利用其通用性和易用性, 您可以开发功能强大的双向数据复制管线, 或在网格中发生任何缓存事件时通知任何客户端应用程序。此外, 您还可以使用任何卡夫卡式 JDBC 接收器接头以及点火源连接器将数据推送到任何 RDBMS 中。但是, 点火源连接器在生产环境中使用它之前, 还有一些限制, 您应该考虑到它:
- 点火源连接器不能并行工作。它不能拆分工作, 一个任务实例处理流。
- 它不处理多个缓存。为了处理多个缓存, 您必须定义在卡夫卡中配置和运行的多个连接器。
- 点燃源连接器需要在嵌入模式下启动一个服务器节点以获得通知事件。
- 它不支持动态重新配置。