

您可能还喜欢:
深度学习与人工智能革命(第一部分)
介绍
深度学习已被证明是业务发展各个方面的关键优势。通过使用深度学习框架,如TFLearn,一个深度学习库,具有更高级别的API为TensorFlow,我们可以快速开发和训练模型,以执行准确和直观的认知任务。
开发一个好的深度学习模型是一个迭代过程,由步骤和子任务组成,需要数据科学家、机器学习工程师和 IT 部署支持团队进行大量协作。
本文分析了交互式深度学习模型开发过程的难点,并提出了在python中使用基于配置的依赖项注入技术在TFLearn上构建神经网络分类器的解决方案。
通过构建示例应用程序(智能客户保留系统)的分步指南,我们将了解此建议的解决方案将如何简化开发过程,并将数据工程和模型设计和模型设计的任务分离。培训。此外,通过降低开发复杂性和团队之间的依赖关系,模型开发将提高工作效率。示例项目的源代码可以在GitHub中找到。
迭代深度学习
使用 TFLearn 开发深度学习模型遵循迭代子流程的阶段循环。通常,开发由不同阶段的迭代组成,这些迭代有助于构建模型以实现所需的认知结果。
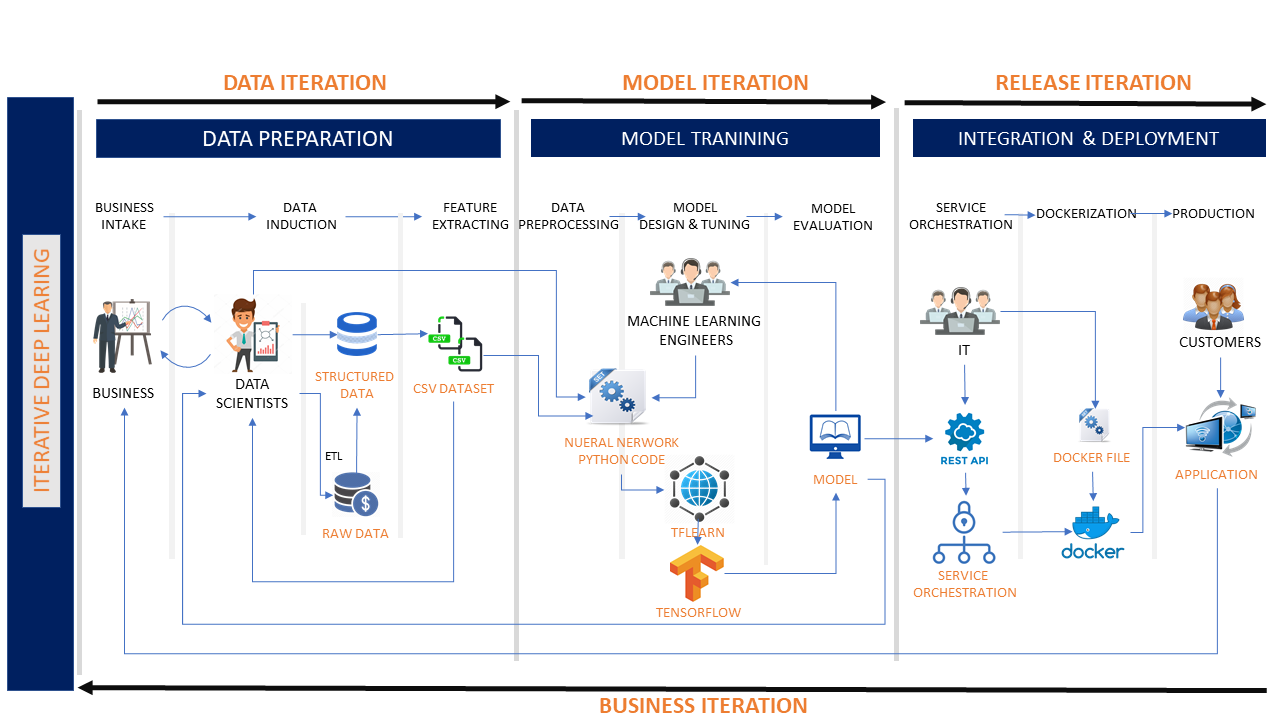
- 数据迭代:一个深度学习项目从数据工程开始。在此迭代中,数据科学家应:
- 分析业务需求。
- 获取原始数据并执行数据转换。
- 提取要素并创建原始数据集。
- 模型迭代:数据集准备就绪后,模型设计/评估迭代开始。
- 在此迭代中,数据科学家应:
- 使数据集以所需的格式可用。
- 预处理数据集。
- 在同一迭代中,机器学习工程师应:
- 设计神经网络模型。
- 使用预处理的数据集训练模型。
- 通过检查准确性和损耗来评估模型。
- 如果模型表现不佳,机器学习工程师需要数据科学家评估结果、确定原因、进行修复,然后再次迭代循环。
- 发布迭代:在训练和测试模型后,它将成为发布迭代
上述迭代开发过程有以下缺点:
- 紧密耦合:数据工程、模型设计和模型训练的各个阶段与强大的依赖性紧密耦合。例如,要训练模型,机器学习工程师必须知道数据集的详细信息。
- 可维护性较差:尽管 TFLearn 减少了构建深度学习模型的编码工作,但副作用是多个团队正在处理相同的源代码,这使得系统难以维护。
是否有解决问题的解决方案?
在 TFLearn 上使用基于配置的依赖项注入
为了改进开发过程,让我们提出具有以下优点的解决方案:
- 基于配置的开发– 通过将应用程序元数据开发为 YAML 配置文件,每个团队应仅维护其配置文件。基于配置的开发消除了团队和阶段之间的依赖关系。
- 更好的可维护性– 该解决方案提供预构建的 python 组件,作为 TFLearn API 包装器,用于数据处理、模型实例化和结果处理。这些组件根据分类器的依赖项配置注入分类器。
- 关注分离– 核心 python 组件由 IT 团队维护。数据科学家和机器学习工程师应通过开发配置文件来专注于数据操作和模型调整。
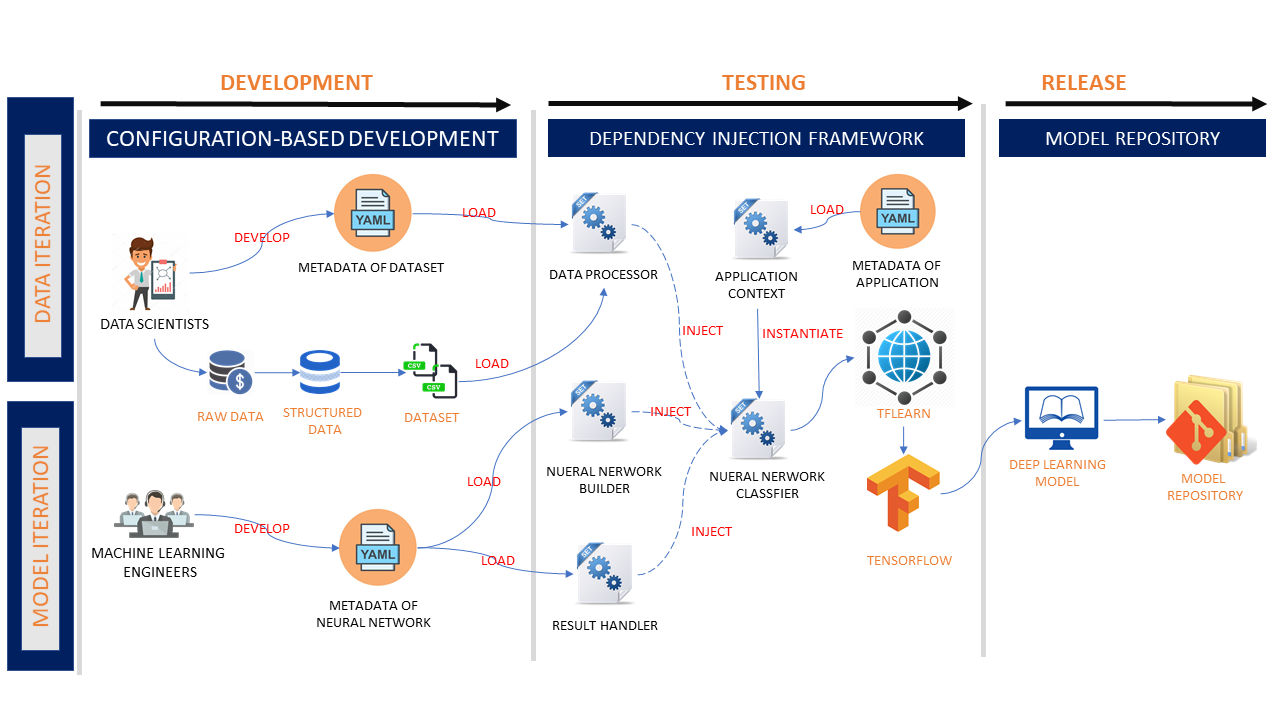
让我们深入了解体系结构和实现:

单例应用程序上下文
单例应用程序上下文对象用作分类器工厂。它加载应用程序元数据,并使用 python 反射技术实例化分类器。
class ApplicationContext:
    """ This is a singleton class initializing the application and working as a classifier factory. """
    __instance = None
    @staticmethod
    def get_instance(name):
        """ Static method of getting the singleton instance """
        if ApplicationContext.__instance is None:
            ApplicationContext(name)
        return ApplicationContext.__instance
    def __init__(self, name):
        """ Private constructor instantiates a singleton object.
            Create classifier instances using reflection based on configurations.
        """
        if ApplicationContext.__instance is None:
            self.classifier_instances = {}
            with open(name) as f:
                self.classifiers = yaml.safe_load(f)['classifiers']
            for classifier in self.classifiers:
                self.classifier_instances[classifier] = getattr(__import__(self.classifiers[classifier]['module']),
                    self.classifiers[classifier]['class_name'])(
                        classifier, self.classifiers[classifier])
            ApplicationContext.__instance = self
    def get_classifier(self, classifier):
        """ Method to get classifier instance by its name"""
        return self.classifier_instances[classifier]
分类
分类器组件由应用程序上下文实例化和维护分类器包含三个子组件:数据处理器、神经网络模型和结果处理程序。分类器配置将所需的子组件注入分类器。
下面是分类器的示例:
class CsvDataClassifier:
    """A Classifier providing the prediction for data"""
    def __init__(self, name, conf):
        """ Private constructor:
            instantiate a classifier with the following sub objects by loading the configurations
            a) build data processor
            b) build neural network
            c) build result handler
        """
        self.name = name
        self.conf = conf
        self.data_loader = getattr(__import__(self.conf['data_loader']['module']),
        self.conf['data_loader']['class_name'])(
            self.conf['data_loader']['data_config'])
        self.neural_network = getattr(__import__(self.conf['neural_network']['module']),
        self.conf['neural_network']['class_name'])(name,
            self.conf['neural_network']['dnn_config'])
        self.result_handler = getattr(__import__(self.conf['result_handler']['module']),
            self.conf['result_handler']['class_name'])(self.conf['result_handler']['handler_config'])
    def build_model(self):
        """ Method to build the classifier:
            a) load and process the data
            b) build the neural network model
            c) train the model
        """
        self.data_loader.pre_process()
        self.neural_network.build()
        self.neural_network.train(self.data_loader.rows, self.data_loader.labels, True)
        return 'Classifier model ' + self.name + ' is built successfully.'
    def predict(self, data):
        """ Method to predict by the input data """
        ids =  for row in data]
        data = self.data_loader.process_data(data)
        results = self.neural_network.predict(data)
        return self.result_handler.handle_result(ids, results)
数据处理器
数据处理器执行数据预处理。它是从数据科学家设计的配置中实例化的。如下所示是 CSV 数据处理器。
import yaml
import numpy as np

from tflearn.data_utils import load_csv


class CsvLoader:
    """A data processor for the csv dataset"""
    def __init__(self, conf_file):
        """ Private constructor initializing the csv data loader with configurations"""
        with open(conf_file) as f:
            # use safe_load instead load
            self.data_conf = yaml.safe_load(f)

        self.rows, self.labels = load_csv(self.data_conf['data_file'],
                                          target_column=self.data_conf['target_column'],
                                          categorical_labels=True, n_classes=self.data_conf['n_classes'])

        self.columns_to_ignore = self.data_conf['columns_to_ignore']
        self.conversion_map = self.data_conf['conversion_map']

    def __pre_process_data__(self, rows):
        """private method of csv data pre-processing"""
        if rows is None:
            rows = self.rows
        # Sort by descending id and delete columns
        for column_to_ignore in sorted(self.columns_to_ignore, reverse=True):

        for i in range(len(rows)):
            # Converting data by converting_map
            for j in range(len(rows[i])):
                if j in self.conversion_map:
                    rows[i][j] = self.conversion_map[j].index(rows[i][j])
        return np.array(rows, dtype=np.float32)

    def pre_process(self):
        """public method of data pre-processing"""
        self.rows = self.__pre_process_data__(None)

    def process_data(self, rows):
        """public method of data processing"""
        return self.__pre_process_data__(rows)
神经网络模型
分类器从机器学习工程师准备的模型超参数配置中实例化神经网络模型
import yaml
import tflearn


class DnnModel:
    def __init__(self, name, conf_file):
        with open(conf_file) as f:
            # use safe_load instead load
            self.model_conf = yaml.safe_load(f)
        self.model = None
        self.name = name
        self.path = 'model/' + self.name + '/' + self.name + '.tfmodel'

    def __load__(self):
        self.model.load(self.path)

    def build(self):
        net = tflearn.input_data(shape=self.model_conf['input_layer']['shape'])
        for i in range(len(self.model_conf['hidden_layers'])):
            net = getattr(tflearn, self.model_conf['hidden_layers'][i]['type'])(net, self.model_conf[
                'hidden_layers'][i]['neuron'], activation=self.model_conf['hidden_layers'][i]['activation'])
            if self.model_conf['hidden_layers'][i]['dropout'] is not None:
                net = tflearn.dropout(net, self.model_conf['hidden_layers'][i]['dropout'])

        net = getattr(tflearn, self.model_conf['output_layer']['type'])(net, self.model_conf[
            'output_layer']['neuron'], activation=self.model_conf['output_layer']['activation'])

        net = tflearn.regression(net, optimizer=self.model_conf['regression']['optimizer'],
                                 loss=self.model_conf['regression']['loss'])

        # Define model
        self.model = tflearn.DNN(net)
        return self.model

    def train(self, data, labels, save_model):
        self.model.fit(data, labels, n_epoch=self.model_conf['fit']['n_epoch'],
                       batch_size=self.model_conf['fit']['batch_size'],
                       show_metric=self.model_conf['fit']['show_metric'])
        if save_model:
            self.model.save(self.path)

    def predict(self, data):
        if self.model is None:
            self.build()
            self.__load__()
        return self.model.predict(data)
结果处理程序
结果处理程序是分类器的可选组件。它将分类结果转换为有意义的、人读的数据。结果处理程序是特定于业务的。
如下图所示是处理客户流失预测的示例结果处理程序。它将客户的忠诚度分数和客户流失预测返回为”是”或”否”。
class CustomerChurnHandler:
    class CustomerChurnResult:
        def __init__(self, customer_id, churn, score):
            self.id = customer_id
            self.churn = churn
            self.score = score

    def __init__(self, conf_file):
        self.results = []

    def handle_result(self, ids, data):
        self.results = []
        for i in range(len(data)):
            result = CustomerChurnHandler.CustomerChurnResult(ids[i], 'Yes' if data[i][1] >= 0.5 else 'No', round(data[i][0] * 100, 2))
            self.results.append(result)
        return self.results
接下来,我们来看一个示例用例,看看这个建议的解决方案如何简化模型开发。
示例用例:智能客户保留系统
智能客户保留使用案例示例说明了深度学习如何为电信 BSS 增加价值。在此方案中,电信服务提供商注意到客户保留流程的手动工作成本增加。业务团队启动一个战略项目,通过构建使用深度学习的系统来解决此问题。
• 系统应该能够预测客户流失,以节省客户管理流程的成本。
• 如果客户预计出现流失,系统应自动处理客户断开连接。
• 如果客户预计留下来,系统应提供优惠的建议,以留住客户。
• 保留部门将能够通过从建议中选择产品/服务来与客户合作cheeli.com.cn/wp-content/uploads/2019/11/12607072-iterative-deep-learning-fig1.gif”宽度=”700″/*
如上图所示,有两个深度学习分类器:
- 预测客户流失。
- 向客户推荐保留产品/服务列表。
让我们看看如何通过编写配置文件而不是 python 编码来构建上述分类器:
应用程序元数据
首先,我们应该构建应用程序元数据。它定义了两个分类器:客户流失和客户保留。每个分类器都包含一组用于数据处理器、神经网络模型和结果处理程序的配置。
#Configuration for classifiers
classifiers:
  customer_churn: #customer churn classifier
    module: data_classifier
    class_name: CsvDataClassifier
    data_loader:
      module: csv_loader
      class_name: CsvLoader
      data_config: conf/customer_churn/data_conf.yaml
    neural_network:
      module: dnn_model
      class_name: DnnModel
      dnn_config: conf/customer_churn/dnn_conf.yaml
    result_handler:
      module: customer_churn_handler
      class_name: CustomerChurnHandler
      handler_config:
  customer_retention: #customer retention recommender
    module: data_classifier
    class_name: CsvDataClassifier
    data_loader:
      module: csv_loader
      class_name: CsvLoader
      data_config: conf/customer_retention/data_conf.yaml
    neural_network:
      module: dnn_model
      class_name: DnnModel
      dnn_config: conf/customer_retention/dnn_conf.yaml
    result_handler:
      module: customer_retention_handler
      class_name: CustomerRetentionHandler
      handler_config: conf/customer_retention/handler_conf.yaml
数据工程
其次,数据科学家分析原始数据并准备原始 CSV 数据集。下面是客户流失的示例数据集:
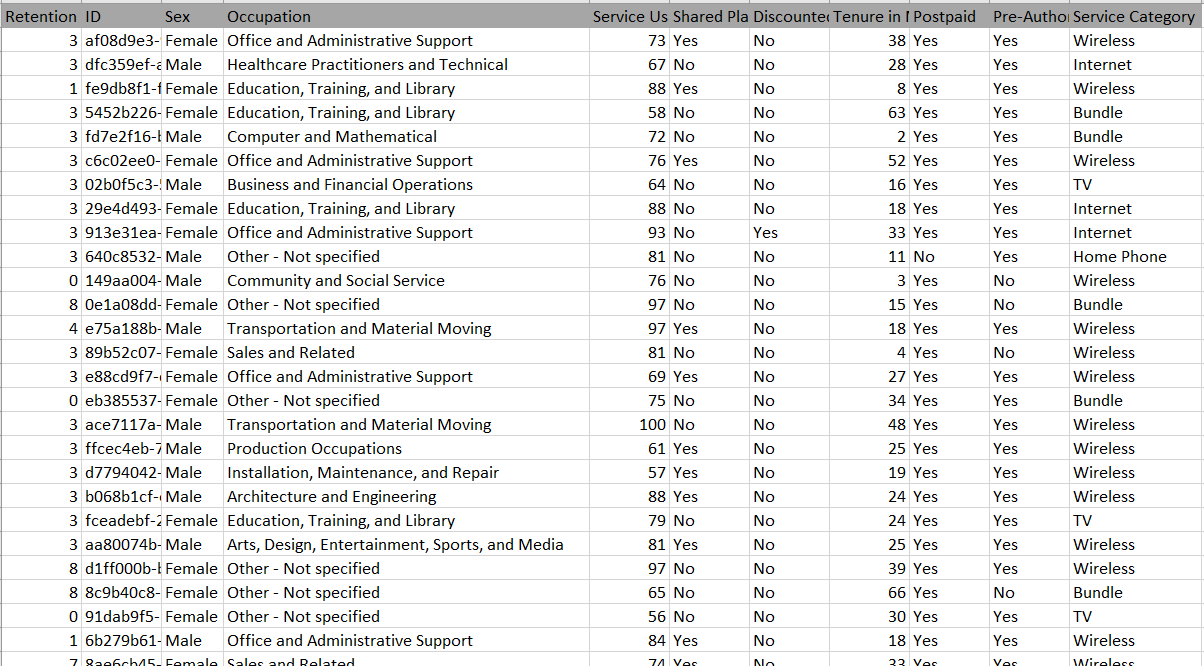
数据科学家应基于 CSV 中的原始数据集提供配置。配置文件定义数据集架构和数据预处理规则。
#dataset processing configurations for customer churn
data_file: data/customer_churn.csv
target_column: 0
n_classes: 2
columns_to_ignore:
  - 0
conversion_map:
  0:
    - 'Female'
    - 'Male'
  1:
    - 'K-12 student'
    - 'Unemployed'
    - 'College/Grad student'
    - 'Food Preparation and Serving Related'
    - 'Personal Care and Service'
    - 'Building and Grounds Cleaning and Maintenance'
    - 'Farming, Fishing, and Forestry'
    - 'Healthcare Support Occupations'
    - 'Self-employed'
    - 'Transportation and Material Moving'
    - 'Office and Administrative Support'
    - 'Production Occupations'
    - 'Sales and Related'
    - 'Retired'
    - 'Protective Service'
    - 'Installation, Maintenance, and Repair'
    - 'Community and Social Service'
    - 'Construction and Extraction'
    - 'Other - Not specified'
    - 'Education, Training, and Library'
    - 'Arts, Design, Entertainment, Sports, and Media'
    - 'Life, Physical, and Social Science'
    - 'Business and Financial Operations'
    - 'Healthcare Practitioners and Technical'
    - 'Architecture and Engineering'
    - 'Computer and Mathematical'
    - 'Legal Occupations'
    - 'Executive/Management'
  3:
    - 'No'
    - 'Yes'
  4:
    - 'No'
    - 'Yes'
  6:
    - 'No'
    - 'Yes'
  7:
    - 'No'
    - 'Yes'
  8:
    - 'Bundle'
    - 'Wireless'
    - 'Internet'
    - 'TV'
    - 'Home Phone'
模型配置和调整
现在,神经网络设计的乐趣部分出现了典型的配置包括超参数,如层、每层神经元数量、激活函数、学习速率优化算法和成本函数等。
下面的示例显示了构建一个输入层、三个隐藏层和一个输出层的深度神经网络的配置。
#Neural network configurations
input_layer:
  shape:
    -
    - 9
hidden_layers:
    - type: 'fully_connected'
      neuron: 32
      activation: 'relu'
      dropout:
    - type: 'fully_connected'
      neuron: 64
      activation: 'relu'
      dropout:
    - type: 'fully_connected'
      neuron: 32
      activation: 'relu'
      dropout:
output_layer:
    type: 'fully_connected'
    neuron: 2
    activation: 'softmax'
regression:
  optimizer: 'adam'
  loss: 'categorical_crossentropy'
fit:
  n_epoch: 10
  batch_size: 16
  show_metric: True
训练模型
下面是用于训练模型的 python 代码:
app_context = ApplicationContext.get_instance('conf/application_context.yaml')
app_context.get_classifier('customer_churn').build_model()
结果如下所示:
| Adam | epoch: 010 | loss: 0.46729 - acc: 0.7987 -- iter: 099888/100000
Training Step: 62494  | total loss: 0.45866 | time: 12.523s
| Adam | epoch: 010 | loss: 0.45866 - acc: 0.8063 -- iter: 099904/100000
Training Step: 62495  | total loss: 0.47568 | time: 12.525s
| Adam | epoch: 010 | loss: 0.47568 - acc: 0.8007 -- iter: 099920/100000
Training Step: 62496  | total loss: 0.47255 | time: 12.527s
| Adam | epoch: 010 | loss: 0.47255 - acc: 0.8081 -- iter: 099936/100000
Training Step: 62497  | total loss: 0.45236 | time: 12.529s
| Adam | epoch: 010 | loss: 0.45236 - acc: 0.8041 -- iter: 099952/100000
Training Step: 62498  | total loss: 0.45618 | time: 12.531s
| Adam | epoch: 010 | loss: 0.45618 - acc: 0.8083 -- iter: 099968/100000
Training Step: 62499  | total loss: 0.46965 | time: 12.532s
| Adam | epoch: 010 | loss: 0.46965 - acc: 0.7962 -- iter: 099984/100000
Training Step: 62500  | total loss: 0.46448 | time: 12.533s
| Adam | epoch: 010 | loss: 0.46448 - acc: 0. 8148 -- iter: 100000/100000
预测客户的流失并获得忠诚度分数
训练模型后,我们可以运行客户流失分类器来预测三个客户:Tony、John 和 Mary。
tony = ['4d316bef-9856-4ea0-aed0-a53e55fed3db', 'Male', 'K-12 student', 20, 'No', 'Yes', 12, 'No', 'No', 'Wireless']
john = ['4d316bef-9856-4ea0-aed0-a53e55fed3df', 'Male', 'Sales and Related', 75, 'Yes', 'Yes', 26, 'Yes', 'No', 'Wireless']
mary = ['7150ae6c-1120-4eb5-b788-0f822f986fae', 'Female', 'Executive/Management', 90, 'No', 'No', 36, 'Yes', 'Yes', 'Bundle']
result = app_context.get_classifier('customer_churn').predict([tony, john, mary])
print("Customer churn prediction for Tony - churn: {} - score: {}".format(result[0].churn, result[0].score))
print("Customer churn prediction for John - churn: {} - score: {}".format(result[1].churn, result[1].score))
print("Customer churn prediction for Mary - churn: {} - score: {}".format(result[2].churn, result[2].score))
如下所示是客户改动预测结果:
Customer churn prediction for Tony - churn: Yes - score: 1.53
Customer churn prediction for John - churn: No - score: 73.91
Customer churn prediction for Mary - churn: No - score: 99.41
为客户保留提供推荐产品/服务
下面是运行客户保留建议引擎的示例代码。
tony = ['4d316bef-9856-4ea0-aed0-a53e55fed3db', 'Male', 'K-12 student', 20, 'No', 'Yes', 12, 'No', 'No', 'Wireless']
john = ['4d316bef-9856-4ea0-aed0-a53e55fed3df', 'Male', 'Sales and Related', 75, 'Yes', 'Yes', 26, 'Yes', 'No', 'Wireless']
mary = ['7150ae6c-1120-4eb5-b788-0f822f986fae', 'Female', 'Executive/Management', 90, 'No', 'No', 36, 'Yes', 'Yes', 'Bundle']
result = app_context
预测(托尼,约翰,玛丽]
打印(”托尼的前3个保留建议: \n 1: {n {n 2: \n 3: {}”格式(
结果 {0}建议{0},
结果{0}建议{1},
结果 {0}建议{2})
打印(”John 的前 3 个保留建议: \n 1: {n 2: \n 3: {}”格式(
结果{1}建议{0},
结果[1]建议[1],
结果{1}建议[2])
打印(”Mary 的前3个保留建议: \n 1: {n {n 2: \n 3: }”格式(
结果[2]建议{0},
结果[2]建议[1],
结果[2]建议[2])
以下是每个客户推荐的三大保留计划的结果:
Top3 retention recommendations for Tony:
 1: Service or Plan Downgrade
 2: Service Discount or Account Credit
 3: Extended Promotion or Price Lock Down

Top3 retention recommendations for John:
 1: Additional Add-on Services
 2: Service Discount or Account Credit
 3: Extended Promotion or Price Lock Down

Top3 retention recommendations for Mary:
 1: Additional Service Usage
 2: Plan Upgrade
 3: Service Quality Upgrade
结论
尽管通过使用 TFLearn 构建深度学习模型变得更容易,但由于迭代开发过程的性质,多个团队都涉及耦合任务。本文介绍了一个基于配置的依赖项注入解决方案,它消除了开发阶段之间的依赖关系,并消除了 Python 编程。
通过使用建议的解决方案,每个团队应只专注于配置配置文件。通过GitHub上的示例项目,我们可以看到它如何通过明确定义的职责范围简化协作并提高工作效率。